Router & Home Server on OpenWRT and Raspberry Pi 4
Table of Contents
Overview #
OpenWRT is my operating system of choice on routers for well over 10 years now. Until recently I was mostly running it on TP-Link hardware such as the TP-Link Archer C7.
A few years ago we moved and I switched to a VDSL2+ internet line. After some experiments with a Telekom Router / WiFi Access Point / Smart Home station that is not quite compatible with anything, it was time for something proper.
Meanwhile, the routing setup consists of:
- a dedicated modem: DrayTek Vigor165 VDSL2+ Modem
- Raspberry Pi 4 Model B, 4GB RAM
- 8GB SD card
- OpenWRT 22.03
- Audio DAC Shim, an I2S Audio device with 3.5mm stereo audio port
- TP-Link TP-SG108E Managed 8-Port Gigabit Switch
that does the following:
- Routing internet traffic, including traffic shaping
- Ad-Blocking via DNS
- Metrics collection via
collectd, into an InfluxDB. I want to move that one into the Docker engine here. - hosting a Docker engine that runs:
- mikebrady’s shairport-sync, which as of recently support AirPlay 2 for multi-room audio.
- Coming soon:
- Monitoring stack (InfluxDB migration or LGTM)
- Home Automation (migration from Synology NAS)
The next few sections describe how I set those things up, as reminder for myself and maybe as help or guide for others.
Routing with One Network Port #
The Raspberry Pi 4 Model B, like all other Model Bs, has one network port. The way to use a Raspberry Pi as router you find on the internet is to add another network adapter, e.g. via one of the USB ports.
I went a different route and use multiple VLANs over that one network link. One VLAN is reserved for communicating with the modem, the other for the rest of the regular network.
Draytek Vigor] ---|VLAN2| p7 p8 ---|"VLAN1 (tagged)
VLAN2 (tagged)"| Router[Router
Raspberry Pi 4B] subgraph Managed Switch TP-Link TL-SG108E p1[1] p2[2] p3[3] p4[4] p5[5] p6[6] p7[7] p8[8] end p1 ---|VLAN1| net[Home Network] p2 ---|VLAN1| net[Home Network] p3 ---|VLAN1| net[Home Network] p4 ---|VLAN1| net[Home Network] p5 ---|VLAN1| net[Home Network] p6 ---|VLAN1| net[Home Network]
The modem provides the dial-in network connection via PPPoE, where discovery of dial-in endpoints is done via ethernet broadcast. Confining the DSL/PPPoE communication to a separate network, albeit virtual, avoids interferences.
The router still mediates between two networks, just that those use the same physical network interface and network cable. In the worst case, all traffic to be sent out via DSL (egress towards the modem) comes via the ingress of the same network interface.
The network port on a Raspberry Pi 4 Model B is a 1000BASE-T port, which is very much sufficient for my 250MBit/s downstream VDSL connection and 40Mbit/s upstream. It remains sufficient as long as upstream and downstream combined don’t reach 1000MBit/s.
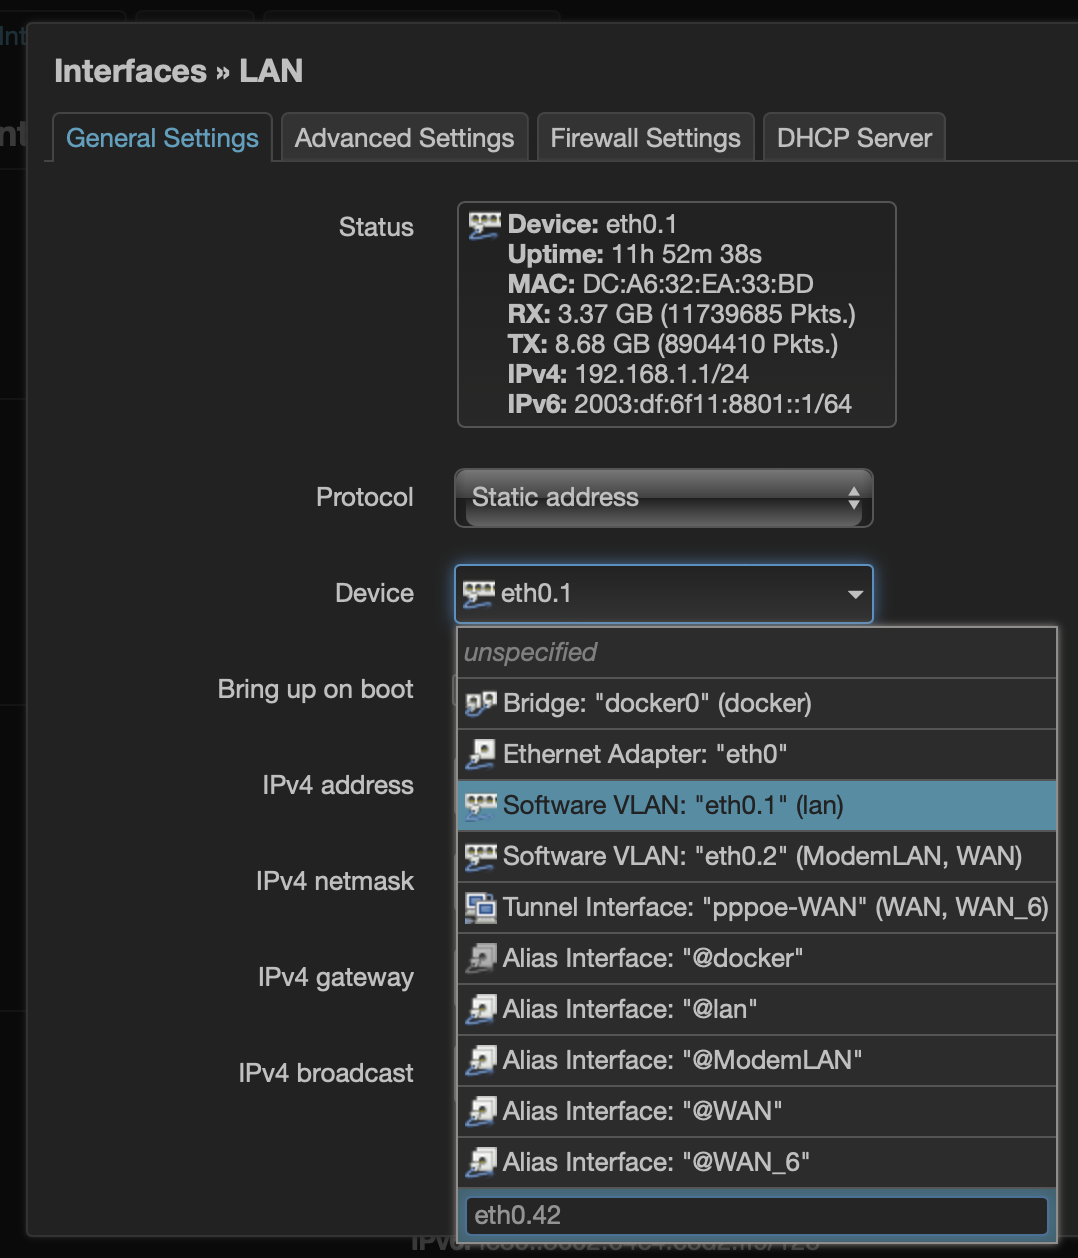
Using VLANs in OpenWRT and Linux #
Network interfaces under Linux have short names, e.g. eth0. Using a special notation, a new virtual network interface tied to a particular VLAN can be created by naming the interface eth0.{VLAN}, e.g. eth0.1 for VLAN 1. The physical network interface, the one with the network cable in it, remains eth0, but will automatically tag its traffic with the configured VLAN.
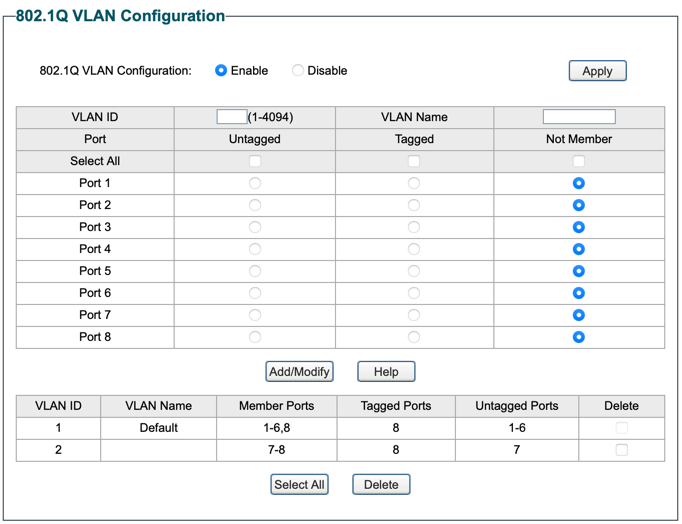
Setting up Tagged VLANs on the TL-SG108E Managed Switch #
I bought the TL-SG108E a long time ago in hardware revision 2.0. This model has (or had) an annoying restriction, where VLAN1 would be added untagged on all ports and could not be removed. Eventually, a firmware update for hardware version 3.0 was released, which allows removing VLAN1 as default VLAN from some ports.
After some browsing in forums I found the suggestion to flash the 2.0 hardware with the 3.0 firmware and it worked flawlessly.
The VLAN configuration now looks as follows:
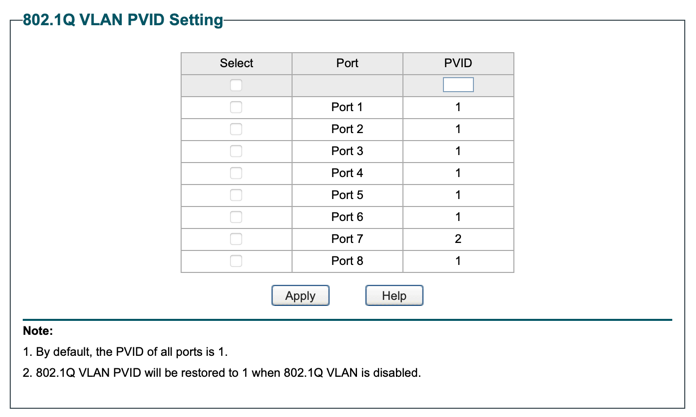
The PVIDs need to be set accordingly as well. The PVID defines, which VLAN tag to set for internal processing, when untagged traffic arrives at this port.
Using a VLAN as WAN Port #
The virtual network interface tied to a VLAN can also be used when setting up the WAN connection. For DSL / PPPoE, this would look as follows:
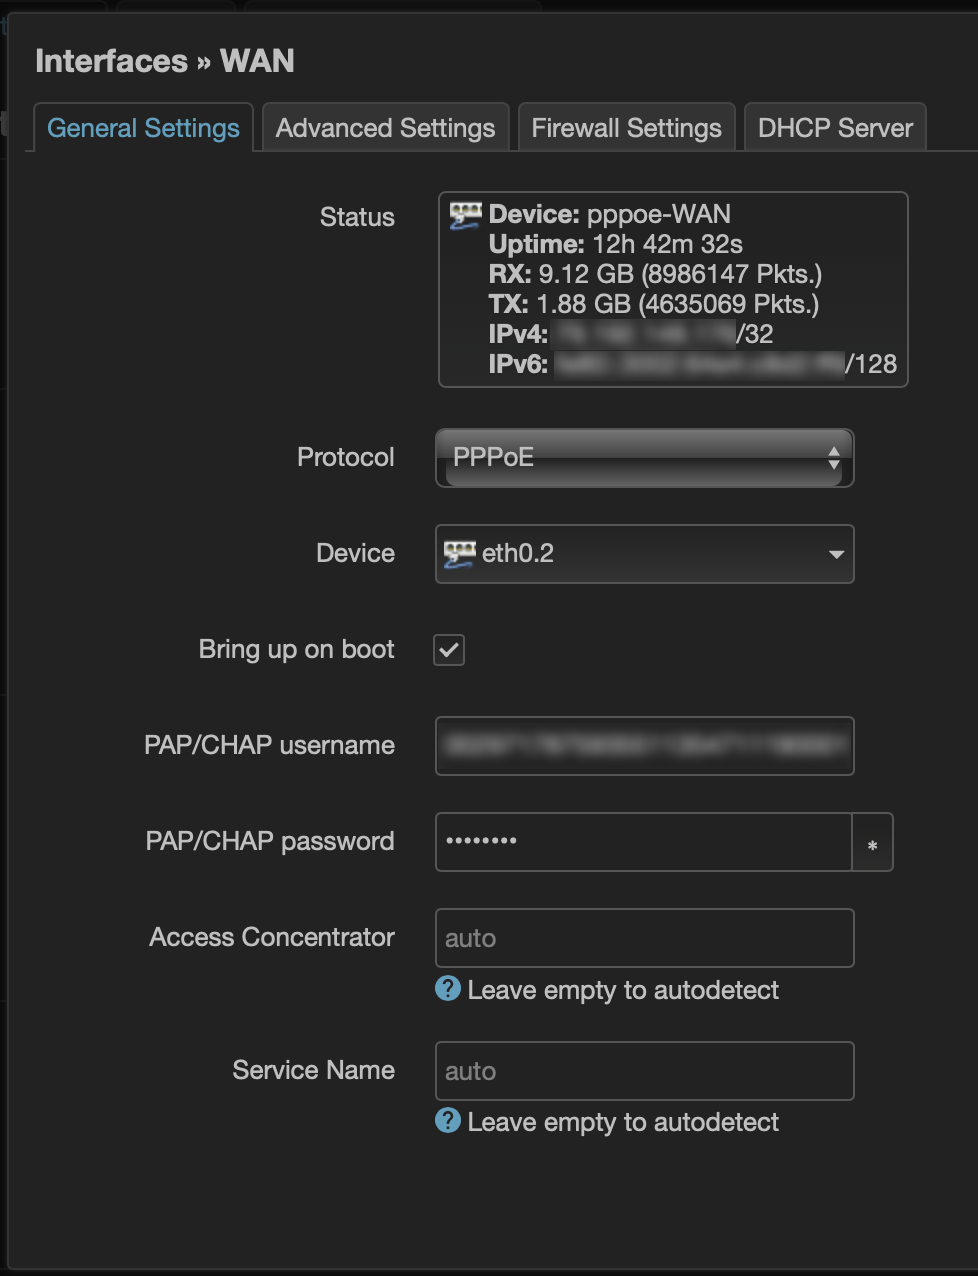
And that’s it. The router will broadcast its PPPoE request via VLAN2, where the Modem will find it. They will establish a connection and the router can do its main job – routing traffic between those two networks, home and the internet.
Traffic Shaping with SQM #
Some time ago I read about Buffer Bloat, which boils down to longer latencies on concurrent network connections when there is a lot of traffic.
Because there are not really multiple connections and all data is multiplexed, a single high-traffic connection can clog up the send buffer with large amounts of data, letting smaller but time sensitive packets wait a long time. This is particularly detrimental for real-time network communication such as online games, audio and video calls or any interaction that is not a large download.
Using SQM to Fight Buffer Bloat #
Fortunately, OpenWRT has plugins for Smart Queue Management (SQM) that allows prioritising small but time critical packets over a number of large but not as time critical ones. Following the recommendations to use FQ-Codel and the OpenWRT Wiki on SQM, I set up SQM for my network connection.
There was one more thing bugging me. VDSL2+ synchronizes with the DSLAM on the ISP side. The downlink speeds for me vary between 230MBit/s and 270MBit/s.
Setting up SQM “just right” requires checking the modem’s actual speed at this point in time and setting the properties accordingly. Fortunately, the modem supports SNMP, which gives you real-time metrics about equipment since before Prometheus was cool.
Querying the Modem via SNMP #
The DrayTek Vigor Modem supports a series of ADSL and VDSL metrics, among others:
SNMPv2-SMI::transmission.94.1.1.4.1.2: adslAtucChanCurrTxRate, aka. “downlink speed”SNMPv2-SMI::transmission.94.1.1.5.1.2: adslAturChanCurrTxRate, aka. “uplink speed”
You can explore the values and the mappings from weird numbers to human-readable identifiers by using a MIB and see the current values via snmpwalk.
Dynamically Adjusting SQM to the Modem’s Current Bandwidth #
DSL works via PPPoE. The PPP connection manifests as new virtual network interface on the router when the connection is established successfully. Linux has a system to run things when hardware (virtual or real) changes, called hotplug daemon.
I hook into that system on the router and provide a script that is run when a network interface comes online (status ifup). In that script, I quickly query the modem for its current synchronisation speeds and set the router’s SQM parameters appropriately.
SQM works on the transmitted TCP/IP data and cannot take additional overhead from DSL into account. The recommendation is to set SQM a little lower than the theoretical maximum of the connection. I set mine to 95% of the advertised speed and had great results.
Scripts #
The following are the scripts I’m using to achieve the above dynamic SQM based on the modem’s current bandwidth.
echo "SQM"
ln -nfs /root/vdsl.sh /etc/hotplug.d/iface/10-vdsl
opkg install snmp-mibs snmp-utils luci-app-sqm xxd bc
vdsl.sh #
/root/vdsl.sh, linked to /etc/hotplug.d/iface/10-vdsl:[ -n "$DEVICE" ] || exit 0
update_sqm() {
FACTOR=95
DOWNLINK=$(( $(snmpwalk -c public -v2c 192.168.0.1 SNMPv2-SMI::transmission.94.1.1.4.1.2.4 | cut -d : -f 4) * $FACTOR / 100 / 1024))
UPLINK=$(( $(snmpwalk -c public -v2c 192.168.0.1 SNMPv2-SMI::transmission.94.1.1.5.1.2.4 | cut -d : -f 4) * $FACTOR / 100 / 1024))
uci set sqm.eth1.upload=$UPLINK
uci set sqm.eth1.download=$DOWNLINK
echo Setting Uplink: $UPLINK, Downlink: $DOWNLINK
uci commit
}
[ "$ACTION" = ifup ] && update_sqm
Installing and Updating OpenWRT #
OpenWRT originated on devices that had 4MB of Flash memory, where there is no space to prepare an in-flight update. The only option was to replace the complete content of the memory with the new version.
That same design decision and update approach still applies to the SD card in the Raspberry Pi. The default images provided by OpenWRT come with ca. 100MB of root partition size. Definitely enough for operating a regular router and setting the lower bounds for SD cards pretty low.
There are some repercussions of this design decision for updates: You can automatically retain all configuration and select folders, which will be carried over into the new installation.
Everything else is lost. This includes:
- All additionally installed packages. This can be a good thing. Some packages are transitive dependencies of other packages and over the years may become obsolete or replaced by something else. By forcing you to re-install the ‘high-level’ packages you get the correct and clean dependency tree after each update.
- Any collected statistics that are stored locally, e.g. via
collectd. - The DHCP lease file, containing current leases. Static leases are in the retained configuration.
- Any scripts and files you may have created that were not added to the list of data to keep.
I interact with the router’s configuration as root user and added the /root path to the directories to be retained in addition to the configuration.
Re-Installing Packages after an Upgrade #
The OpenWRT update process deletes all installed additional packages, as mentioned before.
Whenever I need to install a package, I add it to the install_packages.sh script that is retained across updates. After an update I run it again and the router is back with all its packages.
dockerd for running Docker images. This needs significant space and requires expanding the root partitioninstall_packages.sh #
It is used for bringing up all additional software after an upgrade.
Use the arrow to unfold /root/install_packages.sh.
install_packages.sh: One-stop re-install and update script for opkg and Docker.#! /usr/bin/env sh
echo "Upgrade installed packages"
opkg update
UPGRADABLE_PACKAGES=$(opkg list-upgradable | cut -f 1 -d ' ')
[ "$UPGRADABLE_PACKAGES" != "" ] && opkg upgrade $UPGRADABLE_PACKAGES
echo "Utilities"
opkg install nano htop jq
echo "DNSMASQ full"
opkg remove dnsmasq
opkg install dnsmasq-full
echo "AdBlock"
opkg install luci-app-adblock tcpdump-mini curl
opkg install --force-reinstall coreutils-sort
echo "I2S Audio"
opkg remove kmod-sound-arm-bcm2835
opkg install kmod-sound-soc-bcm2835-i2s kmod-sound-soc-hifiberry-dac
echo "SQM"
ln -nfs /root/vdsl.sh /etc/hotplug.d/iface/10-vdsl
opkg install snmp-mibs snmp-utils luci-app-sqm xxd bc
echo "collectd Statistics"
opkg install luci-app-statistics collectd-mod-cpu collectd-mod-memory collectd-mod-df collectd-mod-ping collectd-mod-processes collectd-mod-interface collectd-mod-dns collectd-mod-uptime collectd-mod-dhcpleases collectd-mod-netlink collectd-mod-snmp
echo "SNMP Daemon"
opkg install mini_snmpd
echo "Install ZSH"
opkg install zsh
ln -nfs /tmp /root/.cache
echo "Install Docker and start Containers"
opkg install luci-app-dockerman dockerd docker-compose
service dockerd start
docker info

docker-compose -f /root/docker/docker-compose.yml up -d --pull always
Expanding the Root Partition #
Coming from other Raspberry Pi Linux distributions (e.g. Raspbian), you may know the “resize file system” operation in raspi-config.
ext4 based OpenWRT images.I have not tried the
SquashFS based ones.As there is no raspi-config in OpenWRT, the script below does the same thing. It is based on the funcionality in raspi-config and some instructions I found on how to get OpenWRT’s overlay file system setup working with the resized partition.
The script finds the root partition, from which the system is booted, runs fdisk to expand it to the total available space and runs resize2fs to expand the ext4 file system on it.
expand_partition.sh #
It is used for expanding the root partition to the media’s total size.
Use the arrow to unfold /root/expand_partition.sh.
expand_partition.sh: Automatically expand the root partition to the media’s total size.#! /usr/bin/env sh
opkg update
opkg install losetup resize2fs parted fdisk lsblk block-mount
BOOT="$(sed -n -e "/\s\/boot\s.*$/{s///p;q}" /etc/mtab)"
DISK="${BOOT%%[0-9]*}"
PART="$((${BOOT##*[^0-9]}+1))"
ROOT_PART="${DISK}0p${PART}"
LOOP="$(losetup -f)"
echo "Expanding the Root Partition: " $ROOT_PART
ROOT_DEV="/dev/$(lsblk -no pkname "$ROOT_PART")"
PART_NUM="$(echo "$ROOT_PART" | grep -o "[[:digit:]]*$")"
LAST_PART_NUM=$(parted "$ROOT_DEV" -ms unit s p | tail -n 1 | cut -f 1 -d:)
if [ "$LAST_PART_NUM" -ne "$PART_NUM" ]; then
echo "$ROOT_PART is not the last partition. Don't know how to expand"
return 0
fi
# Get the starting offset of the root partition
PART_START=$(parted "$ROOT_DEV" -ms unit s p | grep "^${PART_NUM}" | cut -f 2 -d: | sed 's/[^0-9]//g')
[ "$PART_START" ] || return 1
# Return value will likely be error for fdisk as it fails to reload the
# partition table because the root fs is mounted
fdisk "${ROOT_DEV}" <<EOF
p
d
$PART_NUM
n
p
$PART_NUM
$PART_START
y
p
w
EOF
losetup ${LOOP} ${ROOT_PART}
fsck.ext4 -y ${LOOP}
resize2fs ${LOOP}
reboot
Setting up Docker #
Docker is ‘just another package’ for OpenWRT. Docker images and the Docker daemon are pretty large, so expanding the root partition is vital. Once the partition is expanded, Docker can be installed via opkg as usual.
For convenience, I’m using docker-compose to define the various services I want to run, update and control via Docker. After installing Docker I’m also automatically triggering an up command that forces an update of container images and brings services up again if needed.
In most cases this is a no-op. When there is some update, be it in opkg packages or Docker images, having this in one script ensures that everything is up to date once it completes.
echo "Install Docker and start Containers"
opkg install luci-app-dockerman dockerd docker-compose
service dockerd start
docker info
docker-compose -f /root/docker/docker-compose.yml up -d --pull always
The LuCI app for Docker is nice as it gives you an overview of currently running services via the web interface. For interaction with Docker containers I prefer docker, docker compose and particularly lazydocker.
AirPlay 2 with shairport-sync #
shairport-sync since version 4.1 supports the AirPlay 2 protocol and allows multi-room audio from iOS devices.
On the Raspberry Pi 4 I have an Audio DAC Shim that provides high-resolution audio via I2S.
Before the I2S device works, the on-board sound module needs to be removed.
echo "I2S Audio"
opkg remove kmod-sound-arm-bcm2835
opkg install kmod-sound-soc-bcm2835-i2s kmod-sound-soc-hifiberry-dac
Running shairport-sync is then a matter of starting the Docker container. For convenience, I’m using docker compose.
version: "3"
services:
  shairport:
    image: mikebrady/shairport-sync:latest
    network_mode: host
    restart: on-failure
    container_name: shairport
    devices:
      - /dev/snd
    command: -a Office -g -S soxr -M
Home Automation with ConBee II and Home Assistant #
Most of my smart home devices are ZigBee devices. The Dresden Electronic ConBee II USB ZigBee Gateway is controlled by Home Assistant, which in turn is controlled by Apple Home.
DeCONZ, the control software for the ConBee II runs in Docker, as does Home Assistant.
ConBee II and DeCONZ Setup #
ConBee II exposes its services as serial USB device. Some modules are required for using flashing, for firmware updates.
echo "DeCONZ ConBee II support"
opkg install kmod-usb-acm kmod-usb-serial-ftdi usbutils
ConBee II then shows up as /dev/ttyACM0 (or another number, if you have more). The device is massed through to the deconz container and works without hassle.
All configuration is stored in the docker volume deconz, which makes backing up the data simpler. This data includes information on all paired devices.
Losing it would require to re-pair all those devices manually.
version: "3"
services:
  deconz:
    image: deconzcommunity/deconz:stable
    container_name: deconz
    restart: always

    # This is important! Without it, the deCONZ image won't be able to connect to Conbee II.
    privileged: true
    ports:
      - 65080:65080
      - 8443:8443
    volumes:
      - deconz:/opt/deCONZ
    devices:
      - /dev/ttyACM0                # This is the USB device that Conbee II is running on.
    environment:
      - TZ=Europe/Berlin
      - DECONZ_WEB_PORT=65080
      - DECONZ_WS_PORT=8443
      - DEBUG_INFO=1
      - DEBUG_APS=0
      - DEBUG_ZCL=0
      - DEBUG_ZDP=0
      - DEBUG_OTA=0
      - DEBUG_HTTP=0
      - DECONZ_DEVICE=/dev/ttyACM0   # This is the USB device that Conbee II is running on.
      - DECONZ_START_VERBOSE=0
volumes:
 deconz:
Updating ConBee II Firmware #
New firmware can be found on the Dresden Electronic Firmware Page. Some outdated firmware versions are bundled with the deconz image, but I wanted an option to get a specific firmware version, preferably the latest.
The deconz Docker image comes with the flasher tool for the ConBee II. The script (firmware-update.sh) that is provided as part of the image is interactive, but in a bad way. When you know the answer already there is no simple way to just automate the responses.
update_conbee.sh #
Instead, I’m calling the Flasher directly with the right parameters, and it works great.
The firmware and device can be overridden by exporting or temporarily declaring the variables FIRMWARE and/or DEVICE, e.g.:
export FIRMWARE=deCONZ_ConBeeII_0x26780700.bin.GCF
DEVICE=/dev/ttyACM1 /root/update_conbee.sh
Use the arrow to unfold /root/update_conbee.sh
update_conbee.sh script that automatically updates /dev/ttyACM0 to the currently available firmware.#! /usr/bin/env sh
FIRMWARE=${FIRMWARE:-deCONZ_ConBeeII_0x26780700.bin.GCF}
DEVICE=${DEVICE:-/dev/ttyACM0}
echo "Running firmware update on ConBee II to ${FIRMWARE}"
(mkdir -p /tmp/firmware && cd /tmp/firmware && [ ! -f $FIRMWARE ] && curl -O "http://deconz.dresden-elektronik.de/deconz-firmware/${FIRMWARE}")
docker run -it --rm --entrypoint "bash" --privileged --cap-add=ALL \
--device "${DEVICE}" -v /tmp/firmware:/usr/share/deCONZ/firmware/ -v /lib/modules:/lib/modules -v /sys:/sys \
deconzcommunity/deconz:stable /usr/bin/GCFFlasher_internal -d "${DEVICE}" -f "/usr/share/deCONZ/firmware/${FIRMWARE}" -t 60
Home Assistant #
Home Assistant also simply runs in Docker.
services:
  homeassistant:
    image: homeassistant/home-assistant:stable
    container_name: homeassistant
    network_mode: host
    volumes:
      - homeassistant:/config
    restart: always

volumes:
 homeassistant: